
TL;DR
Good Reels sound design starts with a job: hook, clarify, intensify, or pace.
ASMR-style sound works best when the viewer should feel texture, proximity, or tactile satisfaction.
Sound effects are most useful when they make fast edits, actions, or transitions easier to follow.
Voiceover, captions, and on-screen text still matter when explanation is more important than atmosphere.
Teams scale audio quality faster when approved sound assets are organized and reusable.
ASMR sound design techniques for Reels
Use ASMR sound design techniques when the video should feel close, tactile, satisfying, or process-driven. The goal is not to make every Reel whispery; it is to make the viewer feel the texture of the action before they scroll away.
Close-mic texture: record taps, cuts, paper, packaging, typing, fabric, brushing, pouring, or product handling close enough to feel intentional.
Layer one hero sound: choose one sensory cue that carries the moment instead of stacking too many effects over the edit.
Use silence as contrast: a half-second drop before a tactile sound can make the cue more satisfying than constant background music.
Match the visual cut: place the sound exactly on the hand movement, transition, reveal, or object contact so the audio clarifies the edit.
Keep captions available: ASMR improves feeling, but text still protects clarity when people watch without audio.
Quick Definition
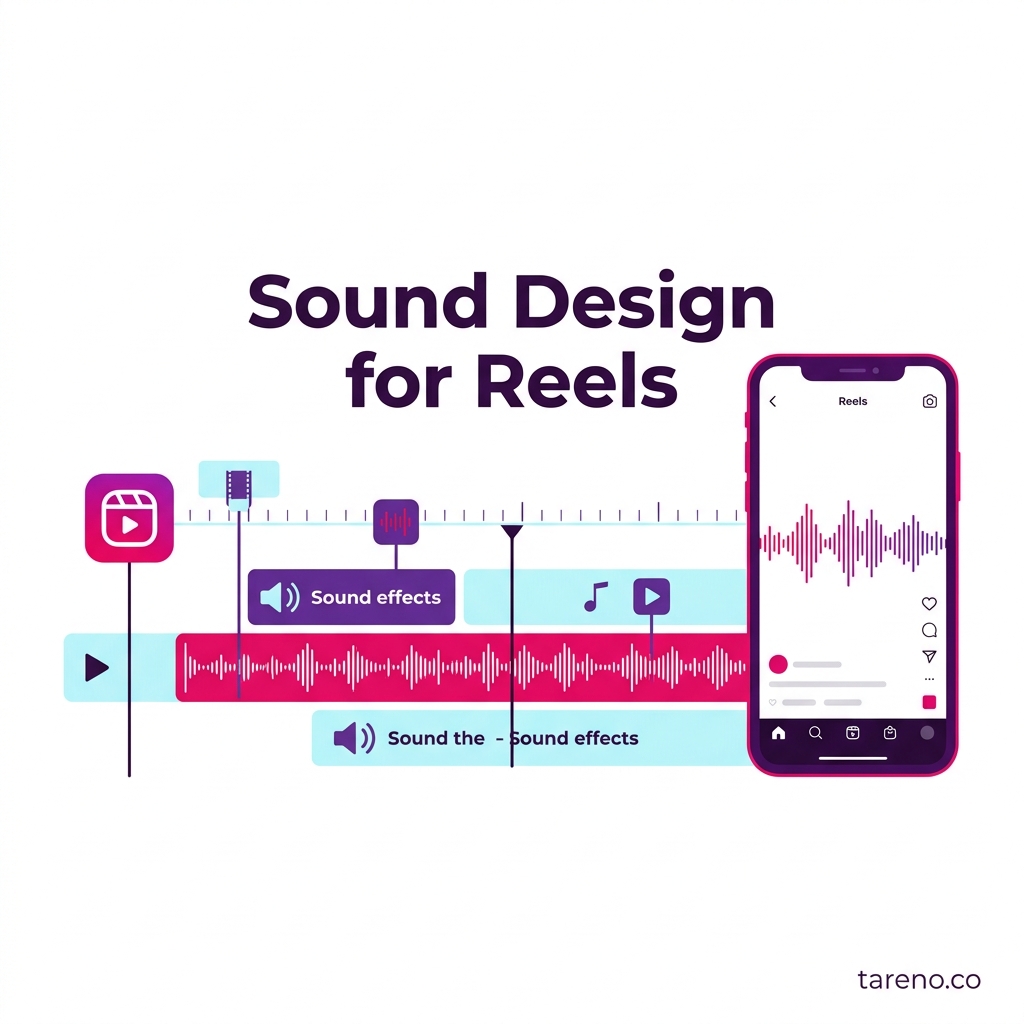
Sound design for Reels is the deliberate use of voice, ambient sound, sound effects, silence, and music so the audio layer supports clarity, pacing, and sensory impact instead of acting as random decoration.
Most creators think about Reel audio too late. They pick a trending track, lower the volume, add one or two effects, and hope the edit feels polished. That approach can work occasionally, but it is not really sound design. It is audio decoration.
Sound design is more deliberate. In a short-form video, every audio choice competes for limited attention. A click can make a UI step easier to understand. A soft fabric sound can make a product feel more premium. A quiet pause before a reveal can create tension more effectively than another background beat. Just as important, the wrong sound can make a Reel feel cluttered, childish, or harder to follow.
This matters because Reels are consumed in mixed conditions. Some viewers listen with headphones. Others watch in public, on low volume, or with sound off until the first seconds convince them to stay. That is why strong sound design is never only about audio. It works together with captions, on-screen text, pacing, and visual clarity.
In practice, the goal is simple: assign each audio layer a role. Use ASMR when texture is the message. Use sound effects when action needs emphasis. Use voiceover when explanation matters. Use silence when more sound would only add noise.
What counts as sound design in a Reel?
Sound design in Reels includes five main layers: voiceover, ambient sound, sound effects, silence, and music bed. You do not need all five in every video. What matters is choosing the right layer for the job.
Voiceover explains, guides, or persuades.
Ambient sound gives the clip realism and physical space.
Sound effects highlight actions, transitions, or interface cues.
Silence creates contrast and keeps the edit from feeling crowded.
Music bed supports mood and continuity.
A simple desk-setup Reel shows the difference. If you keep the real keyboard clicks, add one soft lamp-switch sound, and record a single line of voiceover, the video feels intentional. If you pile on a trending song, two whooshes per transition, fake typing sounds, and a loud notification ping, the same Reel feels overproduced.
The first rule is to decide which layer leads. In a tactile product Reel, ambient or ASMR-style sound may do most of the work. In a tutorial, voiceover usually leads and effects support clarity. In a montage, music may carry rhythm while effects stay minimal.
The LACE Framework for Reels sound design
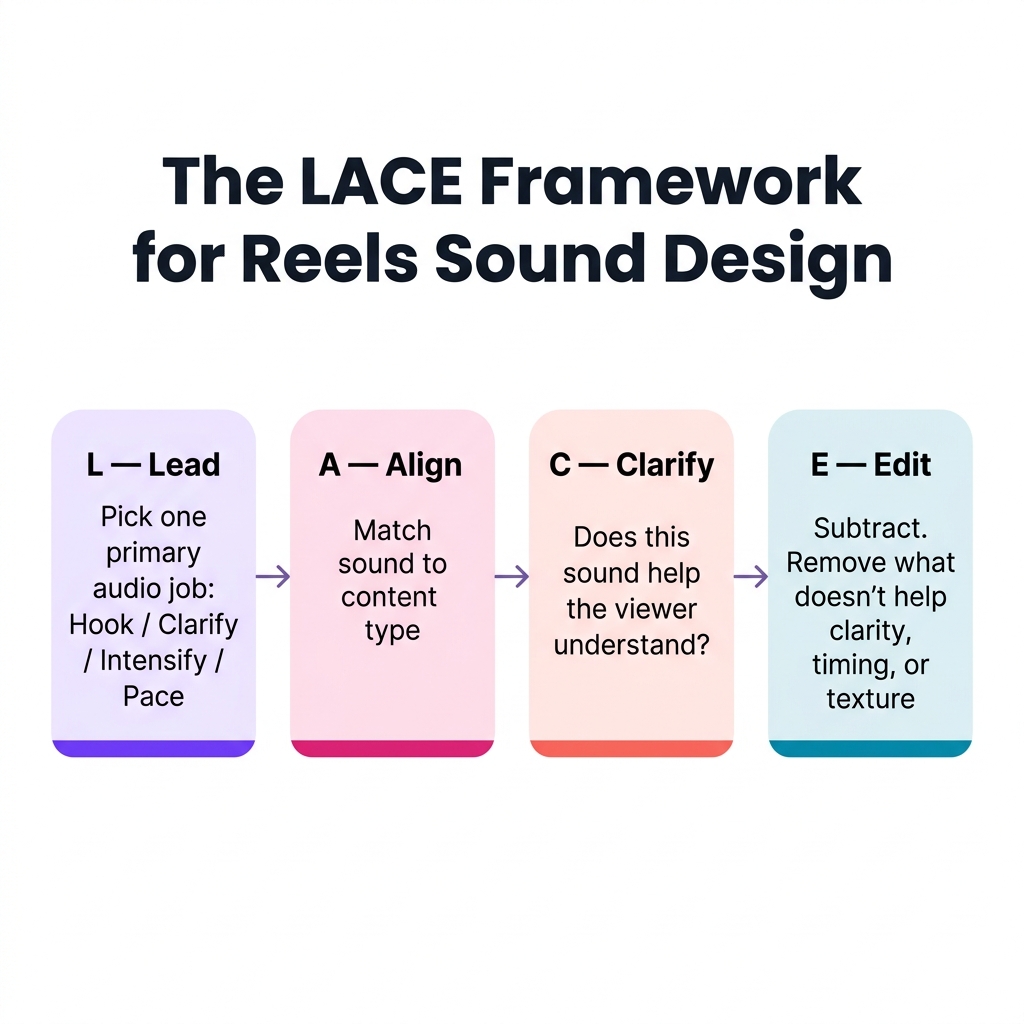
The LACE Framework: four audio decisions that shape every Reel's sound design.
A practical way to make better audio decisions is to use the LACE Framework: Lead, Align, Clarify, Edit. It keeps sound design focused on what the Reel needs instead of what the editing app makes available.
L — Lead with one primary audio job
Start by deciding what the viewer should get from the sound first.
Your primary audio job is usually one of four things:
Hook attention in the first seconds
Clarify what just happened on screen
Intensify a tactile or emotional moment
Pace the Reel so cuts feel intentional
A skincare Reel is a good example. If the point is texture and luxury, the cap twist, pump click, and soft swipe matter more than a heavy music bed. Those small sounds are the hook.
A — Align the sound with the content type
Different Reels need different audio logic.
Tactile product demo: ASMR-style micro-sounds often fit best
Tutorial or explainer: voiceover plus selective effects is usually stronger
Trend remix or meme: short, punchy effects or music cues may fit better
Behind-the-scenes workflow: natural ambient sound can make the clip feel real without much narration
Misalignment is where many edits fail. A dense software tutorial with spa-like ASMR audio usually feels confusing. A candle-pouring Reel with aggressive whooshes and loud meme effects loses the calm sensory mood that made the clip interesting in the first place.
C — Clarify the action
Every sound in a short-form edit should help the viewer understand, feel, or remember the moment better.
Ask three questions:
Does this sound make the action easier to read?
Does it add texture the visuals alone cannot carry?
Does it support the intended mood without distracting from the main point?
If the answer is no, the sound is probably unnecessary.
E — Edit for restraint
The last step is subtraction. Good Reels sound design often improves when you remove layers.
A common mistake is adding a whoosh to every transition, a click to every movement, and a music track that never leaves space. The result feels busy but not more effective. Restraint usually sounds more professional.
A simple rule helps: if a sound does not improve clarity, timing, or texture, cut it.
When ASMR works — and when it does not
In social media, ASMR does not have to mean whispering into a microphone. In Reels, it usually means close, detail-rich sounds that make the viewer notice texture, friction, movement, or material.
That can include:
bottle caps clicking shut
liquid pouring into glass
tissue paper unfolding
keyboard keys tapping
makeup brushes sweeping
knife chops, sizzling, and plating sounds
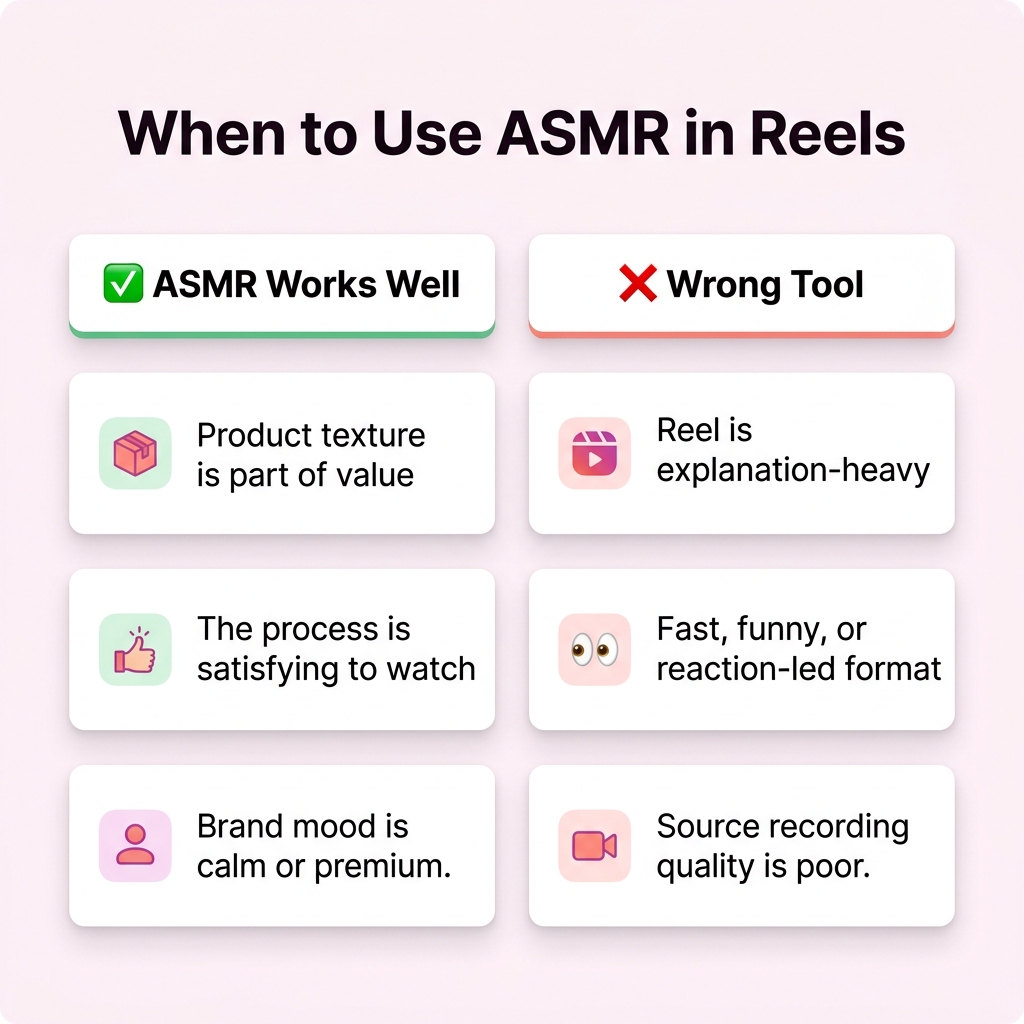
When ASMR works well
ASMR-style sound is strongest when the Reel already has a tactile center.
1. Product texture is part of the value
A serum dropper, zipper close, or watch clasp can tell the viewer something about the object that visuals alone only partly convey.
2. The process itself is satisfying
Packing an order, organizing a desk, icing a cake, or assembling a kit often benefits from close, rhythmic sound.
3. The brand mood is calm, premium, or sensory
Soft detail sounds can make a Reel feel intimate and deliberate without needing much explanation.
ASMR works best when texture is part of the story. It loses effectiveness when explanation is the priority.
When ASMR is the wrong tool
ASMR is not automatically better just because it feels polished.
1. The Reel is explanation-heavy
If the viewer needs instructions, context, or persuasion, a clear voiceover is usually more helpful.
2. The clip is fast, funny, or reaction-led
Comedy, commentary, and fast-cut trend formats often work better with sharper timing cues than with immersive micro-sound.
3. The recording quality is poor
Low-grade phone hiss, room echo, or handling noise does not become ASMR just because it is loud. If the source audio is messy, clean effects or a better re-recorded layer may work better.
A practical decision rule
Use ASMR when the viewer should almost be able to feel the action. Skip it when the viewer mainly needs to understand the action.
A coffee Reel is a good mini-example. The pour, cup tap, grinder click, and milk foam sound can carry the edit. A screen tutorial on scheduling posts cannot rely on those cues. It needs clarity first.
How to use sound effects without making your Reel feel cheap
Sound effects are useful because Reels move fast. A viewer may only need a small cue to understand that something changed, appeared, clicked, opened, or finished. That is where effects can help.
The best jobs for sound effects
Transitions: one light sweep, pop, or hit to mark a cut or reveal
Action emphasis: a tap, snap, or click when the visual movement is subtle
UI explanation: cursor clicks, send sounds, toggle sounds, or notification cues in screen-based demos
Punchlines: a deliberate effect that reinforces timing in comedic or commentary edits
The easiest way to overdo it
Most weak edits fail for the same reason: the effects are louder than the message. If every movement has a sound, none of them feel meaningful.
Watch for these warning signs:
every transition gets the same whoosh
effects compete with speech
effects are brighter or louder than the product moment
the Reel sounds like a template instead of a brand asset
Three rules for cleaner effects
1. Match the effect to the visual size
A tiny motion should not get a huge cinematic hit. A UI click should sound like a click, not an explosion.
2. Use effects to clarify, not decorate
If the viewer already understands the cut, you may not need a cue at all.
3. Leave space between moments
A single well-placed effect often lands better than four layered ones.
A screen-recording tutorial makes this easy to see. One clean click sound when a menu opens, a subtle transition cue before the next step, and a low music bed are often enough. Add exaggerated pops, booms, and constant motion effects, and the tutorial starts to feel less trustworthy.
ASMR vs sound effects vs voiceover vs music-only
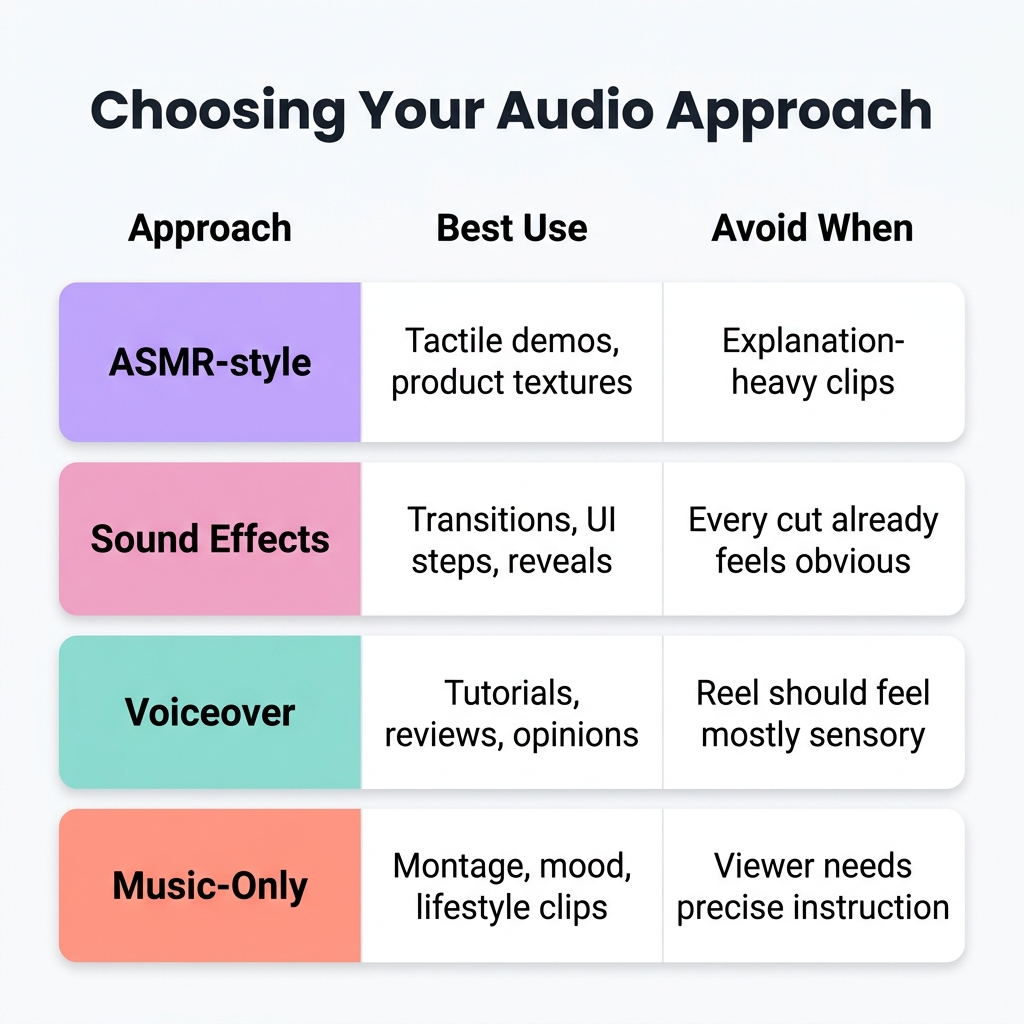
Choosing your Reels audio approach depends on what the viewer needs: texture, clarity, guidance, or mood.
These audio approaches are not interchangeable. They solve different problems.
Audio approachBest useWhy it worksWhen to avoid itASMR-style soundtactile demos, routines, product texturesadds closeness and material detailexplanation-heavy or noisy footageSound effectstransitions, UI steps, reveal momentsimproves timing and claritywhen every cut already feels obviousVoiceovertutorials, reviews, opinions, product explanationgives the viewer direct guidanceif the Reel should feel mostly sensory or ambientMusic-onlymontage, mood, lifestyle clipscreates emotional continuitywhen the viewer needs precise instruction
When to use each approach
Use ASMR when texture is part of the story.
Use sound effects when action needs help reading clearly.
Use voiceover when the Reel must explain, teach, or persuade.
Use music-only when the visual sequence is already self-explanatory.
When not to use each approach
Do not force ASMR into every product Reel just because it sounds premium.
Do not use sound effects to hide weak pacing or weak visuals.
Do not let voiceover over-explain a clip that should feel immediate.
Do not rely on music-only when a product action or process needs context.
One mini-example makes the distinction clear. Imagine a packaging Reel:
ASMR version: tape pull, box fold, tissue rustle, sticker peel
Effects version: one transition cue, one label print sound, one close sound
Voiceover version: “Here is how we pack orders so products arrive protected.”
Music-only version: clean montage, no instructional detail
All four can work. The best version depends on the job the Reel needs to do. If your team is also refining the broader role of narration in short-form content, the related guide on audio-first content strategy can deepen that angle.
A practical workflow for editing Reels audio
The easiest way to improve Reels sound design is to stop treating audio as the last export step. Build it into the edit from the start.
1. Decide the primary audio job before you edit
Ask: is this Reel trying to create texture, clarity, timing, or mood?
A packaging Reel may center texture. A software walkthrough may center clarity. A lifestyle montage may center mood. That decision should control everything that follows.
2. Capture more useful raw audio than you think you need
If a tactile moment matters, record it cleanly. Close-up actions such as typing, pouring, peeling, clipping, or tapping are hard to fake convincingly later.
Even if you plan to replace some sound in post, clean reference audio helps you understand what the moment should feel like.
3. Build one layer at a time
A good order is:
primary audio layer
support layer
low music bed if needed
captions and on-screen text
That prevents the edit from becoming crowded too early. For example, start with the click and swipe sounds in a product Reel, then add a light ambient bed, then decide whether background music still helps.
4. Check whether the Reel still works on low volume
A strong short-form edit should remain understandable even when the viewer only partly hears it. This is where captions and on-screen text matter. Audio should enhance meaning, not hold the entire message alone. That same discovery layer also overlaps with a broader Instagram SEO strategy, where captions and visible context help the platform understand what the Reel is about.
If you are building educational Reels regularly, it also helps to develop repeatable scripts from longer-form source material. Teams that already publish longer videos can often repurpose longer video scripts into reusable content instead of starting every Reel from scratch.
5. Organize approved sound assets for reuse
Once a team starts producing Reels regularly, sound design becomes an operational issue as much as a creative one. Reusable effects, approved music beds, original recordings, and voice clips should be stored in one organized system instead of scattered across folders and chat threads.

A centralized media library like Tareno's helps teams store approved sound effects, voiceovers, and licensed audio for efficient reuse.
A tool like Tareno Media Library fits naturally here as an organizational layer. It gives editors one place to keep approved audio assets grouped by campaign, format, or client so the team spends less time hunting for the right file and more time refining the edit.
6. Export with restraint
Before publishing, mute the music for a moment and listen only to the important sounds. Then mute the effects and listen only to the voice. If either version works better alone, the mix probably needs simplification.
Common mistakes that ruin short-form sound design
1. Treating trending audio as the strategy
A popular sound can give a format context, but it cannot rescue a weak concept or unclear edit. The same caution applies across trend-driven short-form strategy more broadly: trend fit matters, but message fit matters more.
2. Using ASMR where explanation should lead
A tactile sound bed is not a substitute for clear instruction.
3. Overusing the same effect on every transition
Once every cut has a whoosh, the viewer stops registering the cue as useful.
4. Letting music mask the important moment
If the viewer cannot hear the product click, spoken line, or action cue that matters, the mix is working against the Reel.
5. Ignoring captions and text overlays
Strong audio does not remove the need for accessibility and context.
6. Assuming all trending music is safe for commercial use
Business accounts and branded content need extra caution with music rights. If the licensing context is unclear, original or properly licensed audio is the safer route.
Frequently Asked Questions
Do I need trending audio for Reels?
No. Trending audio can help when it fits the format and audience expectation, but it is only one option. Many useful Reels work better with original sound, light effects, or voiceover.
Is ASMR only for beauty and food content?
No. It also works well for desk setups, packaging, crafts, tools, apparel texture, and other tactile processes. The key is that the sound should reveal material or movement the viewer can almost feel.
Can businesses safely use trending music?
Not always. Commercial-use rules and licensing limits can differ from what is available to personal or creator accounts. When in doubt, use original audio, properly licensed music, or approved reusable assets.
Should I add captions if the audio is strong?
Yes. Captions and on-screen text help in muted, noisy, or fast-scroll situations. They also make instructional Reels easier to follow.
What is the difference between ambience and sound effects?
Ambience creates a sense of place or realism in the background. Sound effects are more deliberate cues used to mark specific actions, transitions, or emphasis points.
How do teams store reusable audio assets without chaos?
Create a simple system with folders or tags for licensed music, original sound, recurring effects, voice clips, and campaign-specific files. A centralized media library becomes more valuable as the volume of Reels increases.
Conclusion
Good Reels sound design does not start with a trending track. It starts with a simple question: what should the viewer hear at this moment to understand, feel, or remember the clip better?
When the answer is texture, ASMR-style sound can carry the Reel. When the answer is clarity, sound effects or voiceover usually do more work. When the answer is mood, a restrained music bed may be enough. The skill is not adding more audio. It is assigning each layer a clear job and removing what does not help.
Key Takeaways
Use ASMR-style sound when the Reel is tactile, process-driven, or sensory by nature.
Use sound effects to clarify motion, transitions, and action cues rather than filling every cut.
Use voiceover when the audience needs explanation more than atmosphere.
Keep captions and on-screen text in the workflow because audio conditions vary.
Build a reusable asset system once Reels production becomes a repeatable team process.
